TUTORIAL
Ambassador Edge Stack to Consul Connect
Set up a secure transport layer around a hello world service with Ambassador Edge Stack and Consul
This is a guest post contributed by Steve Dillon, a cloud architect and automation specialist specializing in AWS, Hashicorp and DevOps.

“Everything Changes and Nothing Stands Still” — Heraclitus
Recently I was wrapping up our new ingress to our microservices. We had Ambassador Edge Stack API Gateway accepting inbound connections and then forwarding them off to the Consul Connect based service mesh. Purchasing had taken a couple months to purchase the Ambassador Pro product and I had finally got the installation keys. I was ready to put a big red done stamp on the project.
Then came the news, that Ambassador Pro wasn’t really a thing anymore, and our license keys would be valid on the brand new Ambassador Edge Stack. Ambassador Edge Stack is mostly a rebranding of Ambassador Pro, and most of the security features of Pro now appear in the Community Edition.
As I started again, I documented in this walk though, how to create an Ambassador Edge Stack on Kubernetes and connect it to the Consul Connect Service Mesh. This article builds on the Kubernetes and Consul Connect infrastructure created in another article. Follow this tutorial to create a Consul Cluster on Kubernetes with Consul-Helm. You don’t need to install them sample applications, just create a Consul cluster and log into the management console.
Now that we have similar Consul installations thanks to consul-helm, we will add Ambassador Edge Stack.
Installation of Ambassador Edge Stack largely follows the installation instructions on the getambassador.io web page. I differ from those instructions in:
- I installed consul with consul-helm and consul resource naming is different, many things are named “consul-consul-*” instead of just “consul-*”
- I enabled ACLs on my Consul Cluster
- I only show how to do the full mTLS connection, I don’t bother showing the non-TLS method.
The base helm chart does a pretty good job of installing Ambassador Edge Stack (AES), so install it that way. When installing there will be a repeated warning about a hook, this is known and not a problem.
helm repo add datawire https://www.getambassador.io && \
kubectl create namespace ambassador && \
helm install ambassador --namespace ambassador datawire/ambassador
First Time Login and Licensing
You have now installed the software, but there is bit of work to do to Log in and get it licensed. But don’t worry most of the things you need to explore and use Ambassador Edge Stack (AES) are available in the community edition.
To log into your installation. kubectl -n ambassador get svc ambassador, once that initializes and you have an IP address, you can use your browser to go to http://{ambassador service ip}/edge_stack_admin/#dashboard.
When you browse that URL, it will first land you on a page that warns you the next page will have an untrusted certificate. Accept and go to the next page.

This brings you to the next page. At the bottom it tells you how to install edgectl on your machine. The edgectl login establishes a secure connection to the Ambassador console. Install edgectl and bring up the Ambassador UI by running edgectl login --namespace=ambassador {ambassador public ip}.

On this Dashboard page is a place to give your email and get a license. You don’t need to get a license for this walk-though.
Connecting Ambassador Edge Stack to Consul Connect
In the yaml file for Cluster Role For Administrator, you need to edit the last line of the file, and it probably needs to be “consul-consul-boostrap-acl-token” if you installed with consul helm. Do helm list for a definitive name of your helm release of Consul.
I have added CONSUL_HTTP_TOKEN to enable this container to talk to consul, it needs this due to Consul ACLs being enabled. I would imagine that you can tweak any of the consul communication environment variables in this manner.
#
# You MUST edit the last line of file file and add
# the name of your consul-helm deployment.
# most likely this is consul
#
 ---
apiVersion: rbac.authorization.k8s.io/v1beta1
kind: ClusterRole
metadata:
  name: ambassador-consul-connect
rules:
  - apiGroups: [""]
    resources:
      - secrets
    verbs: ["get", "list", "create", "delete", "patch"]
---
apiVersion: v1
kind: ServiceAccount
metadata:
  name: ambassador-consul-connect
---
apiVersion: rbac.authorization.k8s.io/v1
kind: ClusterRoleBinding
metadata:
  name: ambassador-consul-connect
roleRef:
  apiGroup: rbac.authorization.k8s.io
  kind: ClusterRole
  name: ambassador-consul-connect
subjects:
  - kind: ServiceAccount
    name: ambassador-consul-connect
    namespace: default
---
apiVersion: getambassador.io/v2
kind: TLSContext
metadata:
  name: ambassador-consul
spec:
  hosts: []
  secret: ambassador-consul-connect
---
apiVersion: v1
kind: Service
metadata:
   name: ambassador-consul-connector
spec:
  ports:
  - name: ambassador-consul-connector
    port: 80
  selector:
    component: consul-connect
---
apiVersion: apps/v1
kind: Deployment
metadata:
  name: ambassador-consul-connect-integration
  labels:
    app: ambassador
    component: consul-connect
spec:
  replicas: 1
  selector:
    matchLabels:
      app: ambassador
      component: consul-connect
  strategy:
    type: RollingUpdate
  template:
    metadata:
      labels:
       app: ambassador
       component: consul-connect
      annotations:
        "consul.hashicorp.com/connect-inject": "false"
    spec:
      serviceAccountName: ambassador-consul-connect
      terminationGracePeriodSeconds: 0
      containers:
        - name: ambassador-consul-connect
          image: quay.io/datawire/ambassador_pro:consul_connect_integration-0.11.0
          imagePullPolicy: Always
          resources:
            limits:
              cpu: 200m
              memory: 200Mi
            requests:
              cpu: 100m
              memory: 50Mi
          env:
# Consul runs as a DaemonSet on each Node therefore we need to talk to the Host machine.
# See: https://www.consul.io/docs/platform/k8s/run.html#architecture
            - name: _CONSUL_HOST
              valueFrom:
                fieldRef:
                  fieldPath: status.hostIP
            - name: CONSUL_HTTP_TOKEN
              valueFrom:
                secretKeyRef:
                  key: token
                  name: <helm release name>-consul-bootstrap-acl-token
You need to patch the Helm Release name in this file before applying the file that tells Ambassador to talk to Consul to resolve service names. This file again needs to be checked for the appropriate name of your consul-helm release.
# if you deployed consul with consul-helm then
# you need to verify spec->address matches your
# helm release name.  Do a 'kubectl get service'
# to verify your consul server name.  Or
# helm list to get the release name
---
apiVersion: getambassador.io/v2
kind: ConsulResolver
metadata:
  name: consul-dc1
spec:
  address: consul-consul-server.default.svc.cluster.local:8500
  datacenter: dc1
Creating Hello World
We can now create our demo service, which is a hello-world website (you’d probably normally install a rest service). The installation YAML files differs from the Ambassador Docs due to ACLs. When creating a service when ACLs are enabled a few things must be done for Consul to accept the service.
- You must create a service account
- You must run the pod as the service account
- The first container in the pod must be named the same as the service account.
This yaml file is ready to go, and needs no edits.
apiVersion: v1
kind: ServiceAccount
metadata:
  # This must match annotation "consul.hashicorp.com/connect-service":
  name:  demo-helloworld

---
apiVersion: extensions/v1beta1
kind: Deployment
metadata:
  name: demo-helloworld
spec:
  template:
    metadata:
      name: demo-helloworld
      annotations:
      # https://www.consul.io/docs/platform/k8s/connect.html
        "consul.hashicorp.com/connect-inject": "true"
      # Must match service account (above), this defaults to the
      # name of the first container in the pod.  If ACLs are
      # means:
      # The ServiceAccount.Name must match
      #   pod.spec.conainers[0].name OR
      #   You can override that name here and explicitly match
      #   the servicename, regardless of what the first pod name is.
      #"consul.hashicorp.com/connect-service": "demo-helloworld"
      # This annotation is unecessary in this case, the First Port
      # on the Fist Pod is the default exposed port.  You
      # can explicitly set it here.
      #"consul.hashicorp.com/connect-service-port": 80
      labels:
        app: demo-helloworld
    # pod specification
    spec:
      serviceAccountName: demo-helloworld
      containers:
      - image: karthequian/helloworld:latest
         # The name of the first container in the pod
         # Must match The Service Account Name.
         # You can override with annotation
         consul.hashicorp.com/connect-service
        name: demo-helloworld
        resources:
          requests:
            cpu: 100m
            memory: 128Mi
          limits:
            cpu: 250m
            memory: 256Mi
        ports:
        - containerPort: 80
Create a mapping that maps a URL to a Consul Connect based service. In this case we have Ambassador talk directly to the SideCar and not to the main service name. The Documentation for the Mapping CRD. This file is ready to go and needs no edits.
kubectl apply -f - << EOF
#
# This mapping maps to the sidecar-proxy
# so that Ambassador can do mTLS with Consul
---
apiVersion: getambassador.io/v2
kind: Mapping
metadata:
name: demo-helloworld
spec:
prefix: /helloworld/
service: demo-helloworld-sidecar-proxy
resolver: consul-dc1
tls: ambassador-consul
load_balancer:
policy: round_robin
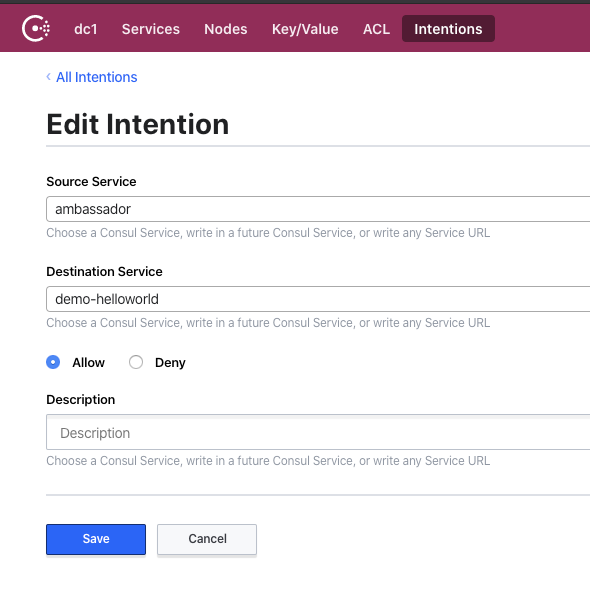
EOFOne final step with ACL enabled Consul. We need to allow Ambassador to talk to the HelloWorld container. In the consul UI, navigate to Intentions->Create and enter, the below.
Gotchas:
- The Ambassador name must be typed out, Ambassador isn’t registering with Consul so it doesn’t appear as a service.
- The ambassador name must be lower case.
- The UI has a default of “Deny” make sure to tick “Allow”.
It may be less error prone to open a shell to a Consul agent and use the cli, this also would allow automated Intention Creation.

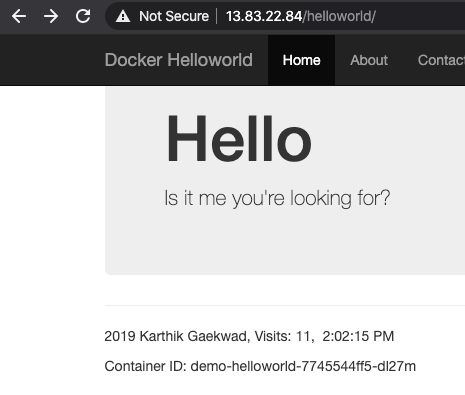
Now navigate to https://<ambassador ip addr/helloworld/ and you should see:
Configure Certificate for Ambassador IP address
So having done all that work to ensure mTLS throughout the service layer, you kinda get an empty feeling about that “Not Secure” https warning in the browser address bar. Let’s fix that.
To make things look professional, configure a DNS entry for the IP address anyway that is easy for you. Not necessary, but makes things look better.
You will be using the UI in the Ambassador console to configure a connection to LetsEncrypt.com. It’s pretty simple and the Ambassador documentation is spot on. Skip down to “Config TLS Termination” and follow the steps there.
Wrapping Up
In this walkthrough we covered setting up the new Ambassador Edge Stack with Helm. This was complicated by having ACLs enabled on our Consul server, and the naming produced by the consul-helm chart. We took a simple hello world service, that knows nothing of Certificates, Service Mesh and Load Balancers and wrapped a secure transport layer around it.