Guest Writer
Kubernetes Tutorial for Beginners
Want to get started with Kubernetes? You are in luck! This detailed tutorial on Kubernetes will teach you Kubernetes basics, how Kubernetes originated, its architecture, concepts, and more!

Origin of Kubernetes
Although the first release of Kubernetes occurred in 2015, its origin is traced to a project called Borg which was created by the folks at Google in 2003. The major problem that led to this project was maintaining free services while managing massive infrastructure hardware without degrading the business revenue. In addition, the attraction of talented engineers to Google led to the rethinking of ways to optimize commodity hardware performance, which led to Borg’s birth.
The Borg system was a small-scale project with an initial team of 3–4 engineers collaborating on the new version of the Google search engine. Being an internal tool, Borg was viewed as a competitive advantage for cost savings and developer(s) productivity. As a result, it remained an internal tool within Google and was later succeeded by the Omega project in 2013.
In 2013, Joe Beda, Brendan Burns, and Craig McLuckie, with the design and development experience of Borg and Omega, looked into the popularity of Docker and decided to create a cloud-native project that combined the Borg and Omega project with Docker. Though the idea was difficult to execute, its importance came to light, and in mid-2014, Google released Kubernetes as the first open-source version of the Borg project. In 2015, Google released Kubernetes version 1.0 and partnered with The Linux Foundation to form the Cloud Native Computing Foundation (CNCF). So, you can think of Kubernetes as an open-source system run by the Cloud Native Computing Foundation.
For context, the name Kubernetes originated from a Greek word meaning helmsman or pilot, and K8s is an abbreviation of Kubernetes. The 8 in the K8s is the total number of letters between the letter “K” and “s” in Kubernetes.
What is Kubernetes?
Kubernetes is a container orchestrator that helps you automate, deploy, scale, and manage your containerized applications. For example, if a container fails, Kubernetes will restart it, and if a container isn’t responding to your user-defined health check, Kubernetes can kill it and stop showing it to your users until it’s ready to serve traffic again.
Key Kubernetes features
Kubernetes has so many amazing features. But here are some of the most important ones:
- Self-healing: Kubernetes enables the killing and restarting of containers that fail user-defined health checks while isolating them from the end-user’s reachability until they are ready to receive traffic.
- Automated rollouts and rollbacks: Changes to a container application are progressively rolled out while monitoring its health to ensure it doesn’t kill all your instances simultaneously. If something goes wrong, Kubernetes will roll back the changes.
- Service discovery: Kubernetes can expose a container using the DNS name or using their own IP address. It can also automatically manage DNS records by specifying and transferring services to their required hosts.
- Load balancing: Kubernetes load balances and distribute network traffic to containers to maintain stable deployment.
- Scaling: Kubernetes scales your application up and down (stateful application) or in and out (stateless applications) through CLI commands, a web UI, or performance metric.
- Resource Monitoring and Logging: Kubernetes monitors the state of resources within the cluster and logs their operations.
- Secret and configuration management: Kubernetes allows developers to store and manage sensitive information (passwords, OAuth tokens, and SSH keys) without rebuilding container images and exposing secrets in their stack configuration.
Kubernetes Cluster
The first step in using Kubernetes is a cluster’s provisioning (creation).
A Kubernetes cluster is a collection of virtual or physical machines, called nodes, which manage and run containerized applications. The nodes that make up a Kubernetes cluster are grouped into master nodes and worker nodes. The master nodes manage the operations within the Kubernetes cluster, while the worker nodes are responsible for running containerized applications. I’ll explain more about this in the Kubernetes Architecture section of this article.
Kubernetes cluster setup
It is possible to provision a cluster manually; however, this is a tedious task that implies the distribution and execution of each master and worker component (to be discussed in the Kubernetes Architecture). As a result, multiple tools emerged to handle the automatic provisioning of a cluster. The process of automatically provisioning a Kubernetes cluster is known as bootstrapping.
The use case (development or production) determines the tool used for bootstrapping. Examples of tools used to bootstrap a Kubernetes cluster are as follows:
Development-grade clusters:
Production-grade clusters:
Most cloud service providers offer Kubernetes-as-a-Service. Some of such services include:
- Amazon Elastic Kubernetes Service
- Google Kubernetes Engine
- Azure Kubernetes Service
- DigitalOcean Kubernetes
- IBM Kubernetes Service
- Oracle Container Engine for Kubernetes
How to set up a Kubernetes cluster using Minikube?
This section will explore how to set up a Kubernetes cluster using Minikube. If you’d like to use other tools/platforms to create your cluster, click on the link shared earlier.
If you’re not ready to set up a Kubernetes cluster yet, that’s fine. You can skip this section and move to the next session, as you can always return to it later. But if not, let’s set up a cluster with Minikube.
Minikube is used to bootstrap a single-node Kubernetes cluster for development purposes. We will set up this cluster using an Ubuntu 20.04 virtual machine on AWS. The minimum requirements to set up a Minikube cluster are as follows:
- 2 CPUs or more
- 2GB of free memory
- 20GB of free disk space
- Internet connection
- Container or virtual machine managers, such as Docker, Hyperkit, Hyper-V, KVM, Parallels, Podman, VirtualBox, or VMware Fusion/Workstation
It’s one thing to have our cluster setup and another to interact with our cluster. In Kubernetes, the most common way to interact with a cluster is by using a Kubernetes command-line tool called kubectl, which allows a user to run commands against a cluster.
As an analogy, imagine how the school library system works with the: student (developer), librarian (kubectl), and library (cluster). The way the librarian serves as the means of communication between a student and the library is the same way kubectl serves as a means for a developer to interact with a cluster. Now that you understand how Minikube and kubectl work, let’s set them up.
Step 1: Update the ubuntu operating system
sudo apt updateStep 2: Create a k8s.sh file
nano k8s.shand then add the following commands and then save and exit the nano editor.
Step 3: Change the k8s.sh file permission and run the script file
chmod 700 k8s.sh
./k8s.sh
Step 4: Create a docker.sh file
nano docker.shand then add the following commands and then save and exit the nano editor.
Step 5: Change the docker.sh file permission and run the script file
chmod 700 docker.sh
./docker.sh
Step 6: Create SSH Key for minikube (press Enter all through)
ssh-keygen -f .ssh/id_rsaStep 7: Install a dependency for minikube
sudo apt install conntrack -yConnection tracking (“conntrack”) is used to keep track of all logical network connections or flows. It is essential for performant complex networking of Kubernetes where nodes need to track connection information between thousands of pods and services
Step 8: Install minikube
curl -Lo minikube https://storage.googleapis.com/minikube/releases/latest/minikube-linux-amd64 && chmod +x minikube && sudo mv minikube /usr/local/bin/Step 9: Start minikube
sudo minikube start --vm-driver=noneN/B: We’re using -— vm-driver=none because minikube is running on a virtual machine. This approach defaults minikube to use docker as its driver.
Step 10: Confirm your minikube cluster is ready by running this command
sudo minikube statusYour output should look like this, meaning that the cluster has been set up successfully.
minikube
type: Control Plane
host: Running
kubelet: Running
apiserver: Running
kubeconfig: Configured
Now, let’s make slight changes to ensure we have a great user experience. Ifor a better user experience. We had initially been using sudo commands previously to set up minikube and as such, the minikube configuration is stored in /root. To enable minikube commands to work with our user (ubuntu), we need to relocate it to the ubuntu user directory. To achieve this, run the command below:
Run Minikube status and confirm it outputs the same result we got with the sudo command. The next thing we are going to do is make the kubectl commands available for the ubuntu user within the cluster. To do this, run the command below:
Great work! Now the cluster has been set up, let’s confirm that kubectl can interact with minikube cluster kubectl get alland you’ll get this output
NAME                 TYPE        CLUSTER-IP   EXTERNAL-IP   PORT(S)   AGE
service/kubernetes   ClusterIP   10.96.0.1    <none>        443/TCP   111m
Great work setting up your first Kubernetes cluster! The next section describes the components of a Kubernetes cluster.
Kubernetes Architecture
Kubernetes is a platform used for container orchestration, and as for every platform, there is always an architectural design behind the hood which showcases its principle of operation. In this section, we will look at the key components that constitute the Kubernetes cluster which is explained as the Kubernetes architecture.
Components of a Kubernetes cluster
As previously mentioned, the master and worker nodes within a Kubernetes cluster contain various components. The components of the master node collectively form the Control Plane, and the components of the worker node collectively form the Data Plane.
The control plane serves as the command center in the cluster, while the data plane serves as the soldier executing commands. Let’s explore these components in detail.

Control plane
The control plane components are responsible for granting external access to a Kubernetes cluster, storing the state of Kubernetes objects, scheduling objects to worker nodes, and detecting and responding to events within the cluster.
The control plane comprises these 5 components: kube-apiserver, etcd, kube-scheduler, kube-controller-manager, and cloud-controller-manager. Here’s a detailed explanation of how each of these components operates:
kube-apiserver
The kube-apiserver is the core component of the control plane and is the entry point to the Kubernetes cluster. It exposes the Kubernetes API to allow users, different cluster components, and external components to interact with each other.
The kube-apiserver allows access to a Kubernetes cluster through either kubectl, a web user interface, or directly through the Kubernetes API.

etcd
The etcd is a key-value store that saves the state of Kubernetes objects. It is the brain of the cluster and communicates only with the kube-apiserver. As an analogy, think of the etcd as the cargo hold used for storage in a ship.
The etcd serves as a backing store for cluster data. It is recommended to provision multiple etcd for high availability.
kube-scheduler
The kube-scheduler is responsible for scheduling pods to nodes. It watches for newly created pods and attaches them to nodes that suit the pod specifications. The kube-scheduler is like a crane on the main ship which transfers loads (pods) to cargo ships (worker nodes) capable of containing such loads.
Pod specifications subject the scheduler to factors required for its attachment. The factors for scheduling decisions include resource requirements and limits, hardware & software constraints, affinity and anti-affinity specifications, data locality, inter-workload interference, and deadlines.
kube-controller-manager
The kube-controller-manager is responsible for running the controller processes in a cluster. A controller is likened to an alarm that watches for changes in the environment (fire, wave, etc.) and triggers based on such changes. A kube-controller-manager is likened to a central system that controls all alarms.
The kube-controller-manager combines the separate controller process into a single binary which runs in a single process. A Kubernetes object with the desired state of more than one will be subject to a controller. We will discuss more Kubernetes objects later on in this article.
cloud-controller-manager
The cloud-controller-manager runs cloud-specific controller processes in a cluster. It links the Kubernetes cluster to a cloud provider’s API and isolates the components that interact with that cloud platform from components that only interact with your cluster.
The cloud-controller-manager is absent for on-premises and local environments. For high-performance, the cloud-controller-manager can be horizontally scaled.
Data plane
The data plane is made up of worker nodes. Each worker node contains three components: kubelet, kube-proxy, and container runtime.

kubelet
The kubelet is an agent that ensures containers are running in a pod. It receives the pod specification from the kube-apiserver and sends it to the container-runtime for container creation. The kubelet manages only containers created by Kubernetes.
container-runtime
The container-runtime is responsible for running containers in a pod. Kubernetes implements the concept of Container Runtime Interface (CRI), which requires that container runtime environments are compliant with the Open Container Initiative (OCI). Kubernetes supports the following CRIs: cri-o, rktlet, frakti, cri-containerd, singularity-cri.
kube-proxy
The kube-proxy is responsible for maintaining network rules on worker nodes. It stores node networking values to a virtual iptable within the node and allows the network connection to pods from within or outside the cluster.
Kubernetes Objects
Kubernetes objects are persistent entities in the Kubernetes system used to represent the state of your cluster. These objects are typically used to do the following amongst other things:
- Deploy and scale containerized applications
- Allocate network and disk resources
- Balance loads across containerized applications
- Describe the behavioral policies of containerized applications, etc.
Kubernetes objects are created using the kubectl command-line tool, a web user interface, or the Kubernetes API. These objects are then managed by the Kubernetes system, which ensures they always exist in the desired state of your cluster. Based on my experience, one of the most common techniques used for creating Kubernetes objects is the kubectl command-line tool.
Kubernetes objects are managed using the imperative approach (defines actions) or the declarative approach (defines desired state).
Basic Kubernetes Objects
There are so many Kubernetes objects. However, this section of the article will focus on the basic ones you need to know to get started with Kubernetes.
Pod
A pod is the smallest deployable unit of Kubernetes. A pod contains one or more containers with shared storage and networking resources, created with the same specification.

A pod can contain two types of containers: the main container (used for the application) and the sidecars container (used to help and assist the main container). The main pods undergo a lifecycle of dynamic creation and destruction based on the desired state of the cluster.
Imagine you wish to deploy a simple blog application and also obtain the logs from the application. To achieve this, you’ll have to create a pod with two containers — the main container will be your blog application, and the side-car container will be the logging agent.
To create a simple pod using the imperative approach, run the command below on your terminal:
kubectl run techtrends --image=joshbolten/techtrendsYour output
pod/techtrends createdConfirm the pod is running
kubectl get podsYour output
NAME         READY   STATUS    RESTARTS   AGE
techtrends   1/1     Running   0          42s
As a little tip, if you wish to generate a template file for the techtrends pod creation on the terminal, you can run this command:
kubectl run techtrends --image=joshbolten/techtrends --dry-run=client -o yaml > pod.yamlThe newly created pod.yamlcan be edited to suit your needs and applied to create the techtrends pod using the command below:
kubectl apply -f pod.yamlIf you want to get more details about the newly created pod, then run this command below:
kubectl describe pod techtrendsTo delete the pod, run this command:
kubectl delete pod techtrendsThe abbreviation for a pod is po. This abbreviation can be used along with the kubectl command. Try it out kubectl get po
ReplicationController
A ReplicationController is used to manage the lifecycle of pods. It creates pods and ensures a specified number of pod replicas always run. The ReplicationController horizontal scales pods and it’s used for stateless applications.
A pod created with the replica controller will automatically be replaced on failure. It is highly recommended to use a ReplicationController if a single pod must always run (although we will see a modern way of doing this with the deployment). Remember our case scenario with the blog application and logging agent earlier? If we wish to always have them running with at least one pod, we can deploy it using the ReplicationController Kubernetes object.
To create a ReplicationController declaratively, create a file named rc.yaml and paste the YAML content below into it.
Now, apply the file to your Kubernetes cluster by running this command:
kubectl apply -f rc.yamlIn doing so, you should get the output below:
replicationcontroller/amb-app createdTo see the number of replication controllers running on your Kubernetes cluster, run this command:
kubectl get rcIn doing so, you should get an output similar to the one below:
NAME      DESIRED   CURRENT   READY   AGE
amb-app   3         3         3       43s
To delete the replication controller we just created, run the command below:
kubectl delete rc amb-appReplicaSet
The ReplicaSet is the next-generation ReplicationController. The major differences between them are:
- The
ReplicationControllersupports equality-based selectors, whereas theReplicaSetsupports both equality and set-based selectors. - The
ReplicationControlleruses this formatselector.label.<label_name>to match pods while the ReplicaSet uses this formatselector.matchLabels.<label_name>. - The label selector of a
ReplicationControlleris added like this:
env = test
tier != frontend
while the label selector for a replicaset is added like this:
env in (prod, test)
tier notin (frontend, backend)
At the time of this writing, it is recommended to use ReplicaSets instead of ReplicationControllers when creating a Kubernetes Deployment object.
Deployment
Deployments are used to define the desired state of your application and take care of the creation and management of ReplicaControllers and ReplicaSets. Deployments are used for stateless applications.

In simple words, you can think of a deployment as a declarative approach to updating Pods and ReplicaSets in Kubernetes. It can be used to deploy a new app, update an existing app, and perform rolling updates, roll back, and roll-outs, amongst other things.
To create a deployment using the imperative approach, run the command below:
kubectl create deployment techtrends --image=joshbolten/techtrends --replicas=4- This will create a deployment named
techtrendsusing thejoshbolten/techtrendscontainer image. - This deployment will create 4 pod replicas since we passed 4 into the
—- replicasfield.
To see the list of deployments in your Kubernetes cluster, run the command:kubectl get deploymentsand it will return an output similar to the one below:
NAME         READY   UP-TO-DATE   AVAILABLE   AGE
techtrends   4/4     4            4           12s
Volumes
A volume is a directory accessible to the containers in a pod to read and write data. There are two types of volumes in Kubernetes: ephemeral and persistent volumes. The ephemeral volume exists with the lifetime of a pod (i.e., the destruction of a pod destroys its ephemeral volume). In contrast, the persistent volumes exist beyond the lifetime of its attached pod.
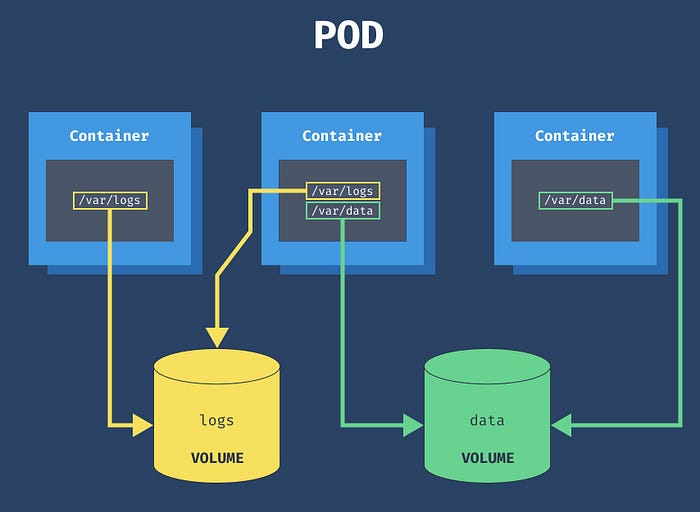
To use a persistent volume, a persistent volume claim must be created and attached to the volume of the pod it is attached to. Volumes are used to mount application configuration, secrets, external storage, etc., to a running container.
Statefulset
A statefulset is used to manage stateful applications. It is used for applications that need the order and uniqueness of its pods (for example, a stable pod hostname). Pods created with Statefulset append an index to the pod name, e.g. mysql-0, mysql-1 and mysql-2, and this identity is maintained even after pods have been rescheduled.
Imagine you have a robust application where you want to have a primary database set aside to perform read and write operations to a persistent storage. Because you wish to scale this database, you will need to create replicas without changing the state of the data stored by the primary database. To achieve this, you will need an object that handles both stateful applications and gives unique identifiers to each replica while scaling out. This is where Statefulset comes in as opposed to deployment, giving random IDs to its pods.

The scaling process of a statefulset works by creating a snapshot of the previous pod data while in a running state. When scaling out, it goes from 0 to n-1 (n = replication factor), and when scaling in, it starts with the highest number (n-1) to 0. This scaling approach is useful if you need to drain the data from a node before it can be shut down. A Statefulset allows your stateful app to use DNS to find other peers.
Service
A service is used to expose applications running in a set of pods. A service serves as an abstraction network layer that defines a logical set of pods and a policy by which to access them. The set of Pods targeted by a Service is usually determined by a selector.

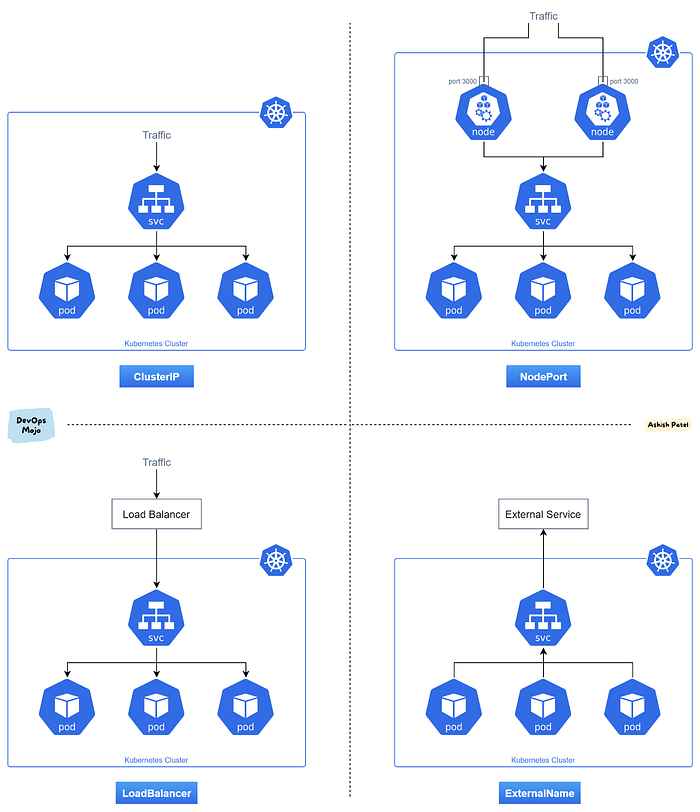
There are four types of services in Kubernetes, namely:
- Cluster IP: The
Cluster-IPservice type is the default Kubernetes service. This service type is used only to access internal traffic. Kubernetes assigns a cluster-internal IP on this service to allow communication within the cluster. For internal communication of an application’s components, this service type can be used. - Nodeport: A
NodePortservice is used to externally expose an application running on a node (server) by assigning the node a static port. This port (dynamically assigned by Kubernetes or the user) is used as the entry-point to the application from the internet (node_ip:nodePort). By standard, Kubernetes allows nodes exposure to a limited range of port numbers from30000 to 32767. Although this service exposes the application to the internet, it is best used for testing and debugging purposes and not for production. The major limitations of using this service are its limited port numbers and maintenance required for changes innode_ipdue to node failure. - Load balancer: The
LoadBalancerservice exposes applications using a cloud provider’s load balancer. Kubernetes uses a cloud provider API to create an application load balancer that directs traffic from the internet to pods running an application. This service type is used when using a cloud provider to host your Kubernetes cluster. The application load balancer is used to expose only one service, which means that for 10 services, you need 10 different load balancers. - External name: This maps a service to an external domain using a Canonical Name (CNAME) record. The external name mapping is performed using the
spec.externalNameparameter as opposed tospec.selectorused by the previously mentioned service types.
Let’s expose our techtrends deployment using the NodePort service type:
kubectl expose deployment techtrends --type=NodePort --name=techtrends-service --port=3000 --target-port=3111From the above command:
—-name: Name of the service to be exposed—-type: service type to be exposed—-port: port used to expose service—-target-port: application port
Confirm the service created by running this command: kubectl get svc.On doing this, you’ll get something similar to the output below:
Behind the hood, Kubernetes maps a port within the range of 30000–32767 (for this case, 31877) to the service port on port 3000. The service port is mapped to the application port 3111.
N/B: port 31877 must be allowed in your instance security group
Assuming you have a public IP of 52.40.234.189, on your favorite browser, enter 52.40.234.189:31877 to see the techtrends homepage
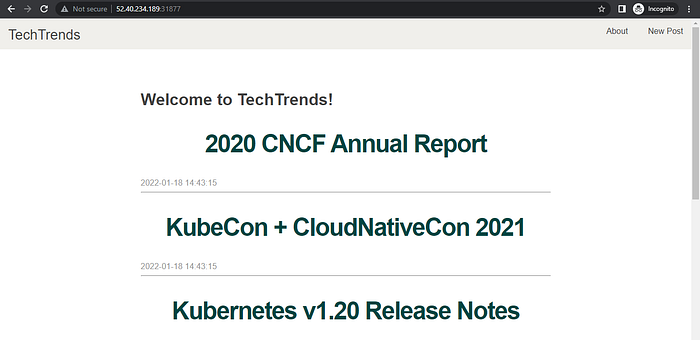
Here is what happened:
- The traffic from the internet (your browser) was routed from port
31877(node port) externally to thetechtrends-serviceon port3000. - The
techtrends-servicerouted the traffic to port3111of your techtrends application.
Ingress
An ingress exposes HTTP and HTTPS routes from a specified domain to its required service within the cluster. The ingress object routes traffic to the desired service through rules defined in the ingress resource.
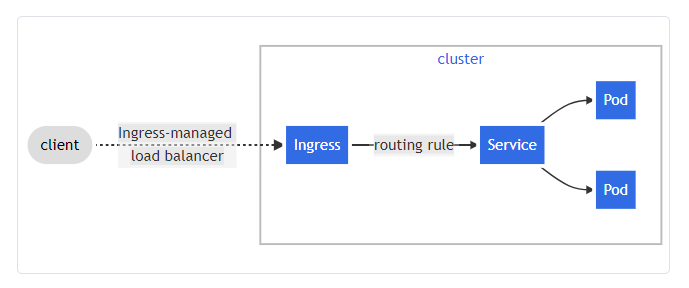
Ingress Controller
The ingress controller controls the execution of the various rules of an ingress object. The ingress controller is the entry point of traffic to the Kubernetes cluster. There are several ingress controllers in the Kubernetes space, and a simplified ingress controller that you could try out is the Emissary-ingress controller. Here is a guide on how to setup an emissary-ingress controller
ConfigMap
A ConfigMap stores non-confidential data in key-value pairs for application configurations. Pods use configmaps as environment variables, command-line arguments, or files from mounted volumes. Read about Kubernetes ConfigMaps
Secrets
A secret is used to store sensitive data in key-value pairs for application configurations. Secrets are, by default, stored unencrypted in the API server’s underlying data store (etcd). Read about Kubernetes Secrets
Real-Life Case Scenario
Wach is a new intern is Brightworks LLC, and on the first day of his onboarding week, the lead engineer briefed him on an upcoming minimum viable product (MVP) focused on improving the people’s department. After the interesting meeting, Wach was given access to the product codebase. As a dynamic engineer, who had just finished learning about the basics of Kubernetes, he decided to create a proof of concept (POC) to operationalize the frontend using Kubernetes. He had successfully packaged the front end and pushed the docker image to Dockerhub.
Now, it’s time to put his Kubernetes knowledge to a little test. To achieve his goal, he decided to go with the following workflow:
- Create a Kubernetes cluster with Minikube
- Create a Kubernetes deployment for the frontend application using the declarative approach
- Create a NodePort service for the frontend deployment using the declarative approach
- Access the frontend application and navigate through it
Wach followed the guide from Ambassador Labs on how to create a Kubernetes cluster with Minikube and moved forward to create a file named udapeople-frontend.yaml that would deploy the application and give him access to navigate around it with his favorite browser.
In the udapeople-frontend.yaml file, he added the snippet below:
The manifest file creates a deployment object named udapeople-frontend-deployment and a service object named udapeople-frontend-service.
The deployment object deploys the udapeople frontend using a replicaset that consists of 3 pods, while the service object maps port 3000 of the udapeople-frontend pods to port 3500 of the service and the service maps its port 3500 to port 31000 of the node (minikube).
Wach applies his configuration to the Kubernetes cluster using this command:kubectl apply -f udapeople-frontend.yaml and then, he gets this output which confirms that the deployment and service were created successfully.
deployment.apps/udapeople-frontend-deployment created
service/udapeople-frontend-service created
He decides to confirm if the deployment is working as it should be running kubectl get deploymentsand then gets the output below which confirmed it worked.
NAME                            READY   UP-TO-DATE   AVAILABLE   AGE
udapeople-frontend-deployment   3/3     3            3           67s
He then goes further to confirm if the service is working as it should be by running kubectl get service and then gets the output below which confirmed it worked.
With this, Wach has now successfully deployed the udapeople frontend and also exposed it for browser access. Great!
Prior to having access to the application, the nodeport 31000 must be allowed for inbound traffic through the security group used to setup your minikube cluster
On Wach’s favorite browser, he decides to confirm the application reachability using the instance public URL and port by entering http://ec2-34-210-242-5.us-west-2.compute.amazonaws.com:31000/
The public ip of the instance could also be used to access the application
http://34.210.242.5:31000/
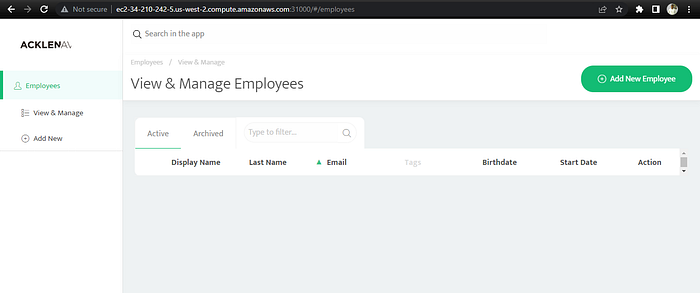
Great! Wach is happy and can explore the application. While exploring the application, Wach decided to document what happened behind the hood in the process of creating a deployment object.
What happens when you create a Kubernetes Deployment?
At this point, we understand the core components of a Kubernetes cluster and its basic concepts and have also seen a real-life case scenario of how to use the deployment and service Kubernetes object. Now, you need to understand exactly what happens behind the scenes when you create a Kubernetes deployment.
When Wach created the deployment using the udapeople-frontend-deployment.yaml YAML configuration file, here’s what happened:
- The
kubectlclient sends an HTTP POST request tokube-apiserverwhich validates the user and exposes the Kubernetes API for Deployment. - The
kube-apiserverstores the deployment manifest inetcdwhile the deployment controller listens to changes to thekube-apiservergets notified of the deployment manifest. - The deployment controller creates a ReplicaSet using the deployment specs and sends a response to the
kube-apiserverto store in theetcd. - The ReplicaSet controller gets notified of the new changes on the
kube-apiserver. With the replica counts and pod selector, the ReplicaSet controller creates the required pods’ state. A response is sent to thekube-apiserverto store the pods' state in theetcd. - The
kube-apiservercreates the pod object without assigning it to a node. The newly created pods trigger thekube-schedulerfor scheduling to a worker node based on its specification. - The
kube-schedulersends a response for pods attachment to thekube-apiserver. This response is updated in theetcd. Thekube-apiserversends the Pod specifications to thekubeletof the appropriate worker node. - The
kubeletuses the pod specification to create the pods within the worker node and notify the container runtime to run the required amount of containers with its appropriate configurations. After all the containers are created and attached to the pods, thekubeletupdates the pod status to thekube-apiserver, and thekube-apiserverupdates the data in theetcd. - On successful creation of containers, the network configuration of the worker node is updated by the
kubeproxy.
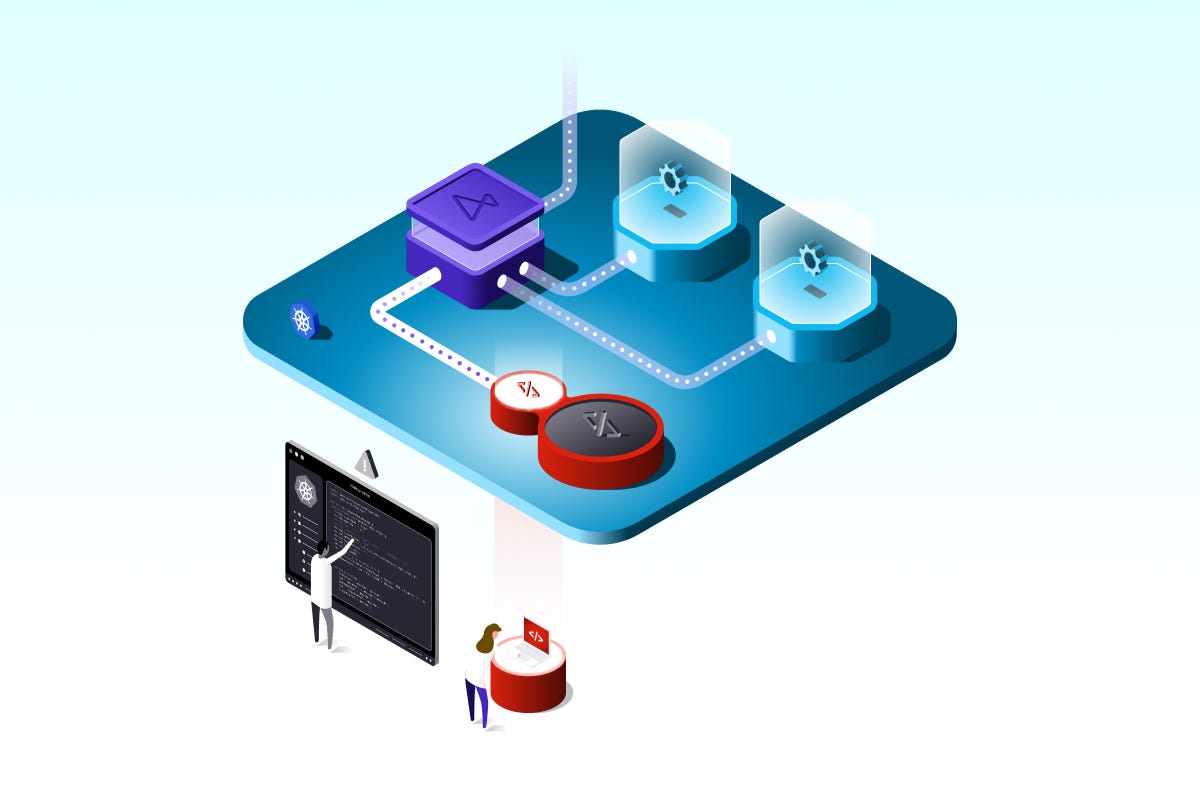
The illustration below shows a basic walkthrough of what happens when pods are created using the deployment blueprint. From the successful creation of containers, Kubernetes takes care of the orchestration for you.

Conclusion
The use of Kubernetes depends on the architectural pattern of your application as it sits between Infrastructure-as-a-Service and Platform-as-a-Service. Kubernetes is required to be understood by platform engineers and application developers to make modern software delivery seamless.
The core concepts learned here are a stepping stone to your journey of container orchestration with Kubernetes. Keep learning!
Telepresence: Rapid debugging & testing of Kubernetes services
Building and testing your microservice-based application becomes complex when you can no longer run everything locally due to resource requirements. Moving to the cloud for testing is a no-brainer, but how do you synchronize your local changes against your remote Kubernetes environment? By using Telepresence!
Telepresence redirects network traffic from a service in the cloud to a service or container on your local machine, merging the benefits of cloud and local test environments. This means you can run integration tests locally instead of waiting on a remote deployment.

