Implementing Telepresence Networking with a TUN Device
Aiming to make Telepresence’s approach to networking more consistent with that of a traditional VPN, while also getting stability and portability gains, we decided to change Telepresence’s networking architecture to use a TUN device.
In this blog post, I’m going to explain how and why. You can also hear me talk about this topic in the recording of my Dev House session.

What does Telepresence do?
Before we get into the changes to Telepresence, though, we need to talk about what Telepresence does in order to understand the use case.

Typically, there are two ways to interact with a Kubernetes cluster: through its ingress — the same port of entry that you expose to your users — or through its API server, usually via kubectl. Kubectl is great for administrative tasks; it allows you to scale up an application, or expose a new service. In a pinch, it even allows you to request specific pods by port-forwarding them.
However, this workflow breaks down when you need to develop an application. In a microservice environment, it’s likely that your applications will issue network requests to other applications, typically by leveraging Kubernetes’s DNS resolution mechanisms for service discovery. This is easy to do when the application runs in-cluster, but how can you run it locally? Modifying it to access a port-forward when running locally is probably not sustainable: every new dependency means a new port-forward, and new special logic in the application.
Telepresence solves all this by giving you a network connection directly into the cluster; you can call services by their DNS name and get the exact response you would expect if you were running in-cluster. This lets you run your application locally without any special logic, configuring exactly as you would if it were running in production.

How does Telepresence connect you to Kubernetes?
In general, Telepresence’s approach to networking is quite straightforward: a local daemon running on your work station opens a tunnel to a pod on the cluster — the traffic manager — and shuttles network traffic to and from the tunnel. The traffic manager, which sits on the cluster, is responsible for dialing the pods you request and sending their responses back into the tunnel.

But how does traffic make it from a local application to the daemon? Say you curl one of your services — how does curl’s HTTP request make its way into the daemon so that it can send it to the traffic manager? And how does the response from the traffic manager make it back from the daemon to curl so that the command can succeed?
This is what the TUN device solves, but before explaining the solution, let’s talk about the state of the problem preceding the existence of the TUN device.
Historical background: Telepresence via firewall rules
Our first implementation of Telepresence 2.0 relied on manipulating firewall rules to achieve this cluster connectivity. Firewalls — such as Linux’s iptables — are commonly used to filter network traffic, allowing or denying packets based on certain rules. They can also be used to redirect traffic from one endpoint to another.
This is what Telepresence versions before 2.3.0 leveraged to allow you to connect to your cluster.
The local Telepresence daemon spun up a SOCKS proxy on a given port, then figured out the IP address of each and every pod and service on the cluster (e.g., “10.42.0.2 for pod A and 10.100.0.3 for service A”). It then manipulated the firewall to add rules that redirected traffic from each of those IP addresses to 127.0.0.1 on the SOCKS port. Once traffic reached the proxy, it was sent to the traffic manager, which forwarded it to the destination, awaited the response, and responded through the proxy.
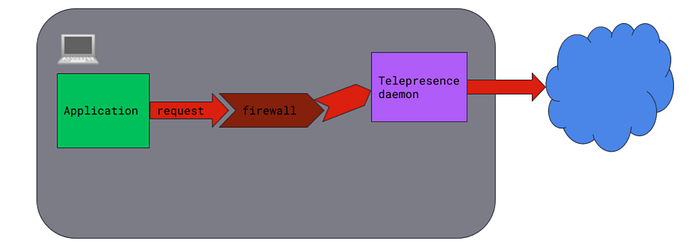
Unfortunately, this approach presented a number of problems:
- It introduced a dependency on SOCKS and SSH, which may not be present on every user’s machine.
- It’s platform specific — the way the firewall is configured on Linux differs from the way it’s configured on MacOS.
- Similarly, there is no straightforward way for Telepresence to create such Firewall redirects on Windows.
- Because Telepresence is manipulating the firewall, things can go wrong if the user has pre-existing firewall rules that conflict with Telepresence.
- Similarly, a Telepresence crash can leave behind firewall rules that aren’t in use, which then have to be cleaned up manually, as they point to a proxy that is no longer live.
- It didn’t scale very well. Large clusters with thousands of pods resulted in thousands of rules that had to be constantly maintained.
The TUN Device
Our solution for these problems, which was released in Telepresence 2.3.0, was to implement a TUN device. The result is that connecting to the cluster via Telepresence is now much more like connecting to a VPN; indeed, TUN devices are typically used by VPN clients to provide access to a private network.
But what’s a TUN device?
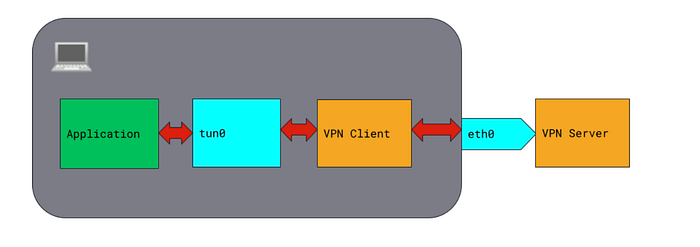
You can think of a TUN device as a virtual network card that grants access to a specific network via a user space process that routes traffic through a physical device.
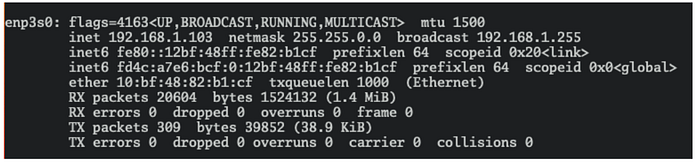
Think of how a Linux system, for example, connects to the internet. There is a physical ethernet card on the machine, and there is an ethernet cable plugged into the card. The Linux kernel represents this ethernet card as a network interface, often named eth0 or something similar. The kernel knows that this network interface has a specific IP address assigned to it, such as 192.168.1.103, and uses a specific gateway, such as 192.168.1.1 to route traffic to a specific network; if there’s a single network card, this is typically 0.0.0.0, i.e. the entire internet.

A TUN device is represented by the kernel in exactly the same way — it has an IP address, might have a gateway, and routes access to a given network. The only difference is that a TUN device is not a representation of an underlying physical device. Instead, when packets are sent to a TUN device, the kernel expects a user space process to read them from it and handle them however it likes. In other words, a TUN device is what is typically called a virtual network interface, or VIF: a network interface that does not directly correspond to a physical network device.
VPNs are the most common use case for TUN devices; in a VPN, the client would read packets from the TUN device, encrypt them, and dump them into the open tunnel to the VPN server (i.e., dump them, encrypted and re-routed, into a “real” device, such as eth0). The VPN server will receive the packets, decrypt them, and route them to their destinations. Any responses will be encrypted by the server and placed back into its tunnel with the client, which will then read them (on eth0 on the client machine), decrypt them, and place them on the TUN device for the user’s program to see.
How does Telepresence use a TUN device?
You might have noticed that when you first run Telepresence connect it starts up a root daemon and a user daemon. The first of these, the root daemon, is responsible for the creation of the TUN device. The actual procedure for registering a TUN device with the OS is system-specific and beyond the scope of this post, but the general flow followed by the root daemon is as follows:
- Create a new TUN device
- Request cluster networking from the traffic manager
- The traffic manager will run various heuristics to determine the CIDR ranges for pods and services within the cluster, and reply to the root daemon
- Register the traffic manager’s provided CIDRs with the TUN device, allowing the operating system to route traffic to them via the device.
Thus if the traffic manager reports that pod IPs occupy the CIDR range 10.42.0.0/16 and that service IPs occupy the CIDR range 10.100.0.0/16, it will add these as routes on the TUN device. When the operating system has to route a packet to an address on either of those ranges, it will send it to the TUN device instead of a physical network interface.
A TUN device can typically be accessed just like a file: the user space process that owns it (the Telepresence root daemon) can read packets from it and write packets to it. Packets read from a TUN device are packets that an application wishes to send to the routed network, while packets written to it are responses from the network to the application (the OS is responsible for ensuring that packets written reach the appropriate application). Telepresence therefore has to follow a relatively simple process:
- Read a packet from the TUN device
- Does it represent a new connection?
a) Yes: Open new GRPC tunnel to the traffic manager for this new connection
b) No: Grab existing GRPC tunnel for the existing connection - Write packet to GRPC tunnel
The traffic manager at the other end simply needs to:
- Accept incoming requests for new tunnels
- Read a message out of a tunnel
- Does it represent a new connection?
a) Yes: Open a new network connection (TCP or UDP) to the in-cluster destination
b) No: Grab existing network connection to the in-cluster destination - Write packet to network connection
Naturally, the process is repeated in reverse for responses. The traffic manager writes the response into the tunnel, and the daemon reads it and writes it to the TUN device.

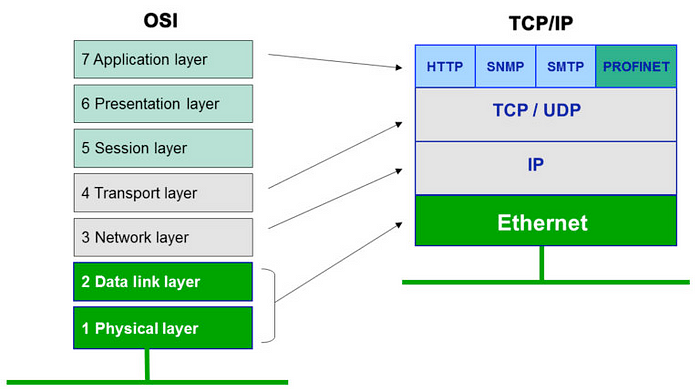
However, this nice and simple procedure is complicated by the level of abstraction at which a TUN device operates in an OS. You may be familiar with the OSI model of networking layers.
Protocols such as HTTP and GRPC are implemented at the highest layer of the model, and in general an application will only deal with layers 5–7. This means that if you are an application author, all you have to worry about is creating TLS and HTTP requests/responses and dumping them into an open socket; your OS will add layers 4 and 3, and your ethernet card will add layers 2 and 1.
The problem confronting Telepresence is that when an application writes to a socket connected to a network destination mapped by a TUN device, the OS will automatically add layers 3 and 4, so that Telepresence will see a packet containing layers 3–7. Similarly, a packet written by Telepresence to the TUN device will have to include layers 3 and 4 so that the OS is able to route it to the correct local application. So the Telepresence root daemon running on your local machine is dealing with TCP/IP packets, but the traffic manager running in the cluster is merely using Golang’s network stack to open connections to in-cluster destinations, and the Golang network stack expects to see layers 5–7 only so that the OS can add layers 3 and 4.
The solution we came up with is to unwrap the TCP/IP layers directly in the root daemon, and write only application-level payloads to the GRPC tunnel. As such, when the traffic manager receives data from a local client, it merely needs to find the right connection and write the data into it. This, however, does require Telepresence to re-implement TCP; effectively, it needs to remember the TCP connection state as proclaimed by outgoing packets so that it can synthesize a new connection state when receiving incoming packets. In other words, if it sees that an outgoing packet has seq number 123, it must remember that the next response in that connection’s tunnel must have an ack number of 123 (see this link if you need a refresher on how TCP works).

Evaluating the solution
So problem solved, right? We have a way to plug into the cluster as though it were just any other network (or any other VPN), but did we solve the problems presented by the firewall approach?
- There’s much less platform-specific code now. All that’s required are the system calls to create and configure the TUN device; the rest is platform-agnostic.
- Thanks to the fine folks at wintun.net there is an easy way to create a TUN device on Windows.
- It requires far fewer dependencies: wintun on Windows, nothing on Mac or Linux.
- No more conflicts with the firewall — we don’t manipulate firewall rules at all any more (except for some Linux-specific edge cases that are unrelated to connection tunneling).
Of course, every solution has trade-offs, and there is still work to be done to perfect the TUN device:
- There is much more code involved than in the firewall-based implementation. In particular, the TCP implementation is a relatively complex piece of code that still needs more testing. There are testing frameworks that can stress-test TCP implementations; we need to bring one into the fold.
- There is much more logic involved in processing traffic, and we need to optimize all of it for latency and throughput.
- As this effectively turns Telepresence into a sort of VPN, we need to work with the community to make sure it works with all VPN providers and that users have a straightforward way to debug non-working VPN configurations.
- The traffic manager is not currently highly available; we need to make it scalable so that it can handle as much traffic as our users want to throw at it.
Get started with Telepresence
Get started in under 5 minutes with the Telepresence Quick Start today! Telepresence supports developing with any language, and to make it easier for you to get up and running we’ve added specific tutorials in Golang, NodeJS, Python (Flask) and Python (Fast API). More tutorials are coming soon, and we welcome community contributions. Need help? Don’t forget to join us on Slack.